 Tetrate Istio SubscriptionVersion: Next
Istio PKI Integration with HashiCorp Vault
Introduction
This guide offers detailed, step-by-step instructions to help you set up a Vault PKI as the source of truth to
issue an intermediate CA certificate for istiod. This intermediate is fetched by cert-manager, stored in a
Kubernetes secret (cacerts), and used by Istio for signing mTLS workload certificates.
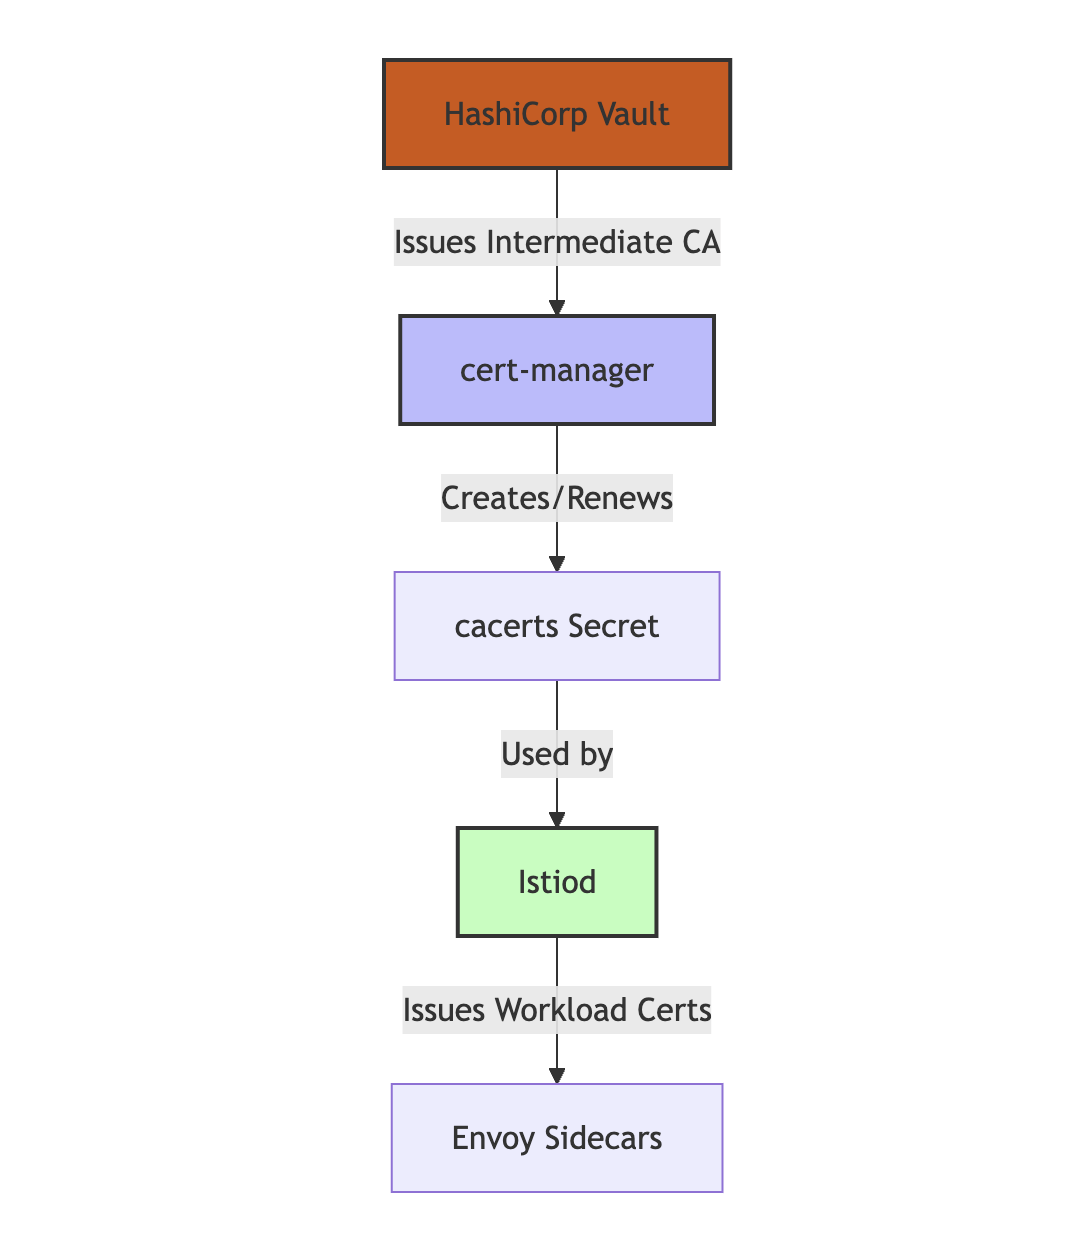
Architecture Overview
The integration involves the following components:
- Vault PKI: Acts as the root of trust and the source of truth for issuing the intermediate CA certificate.
- Cert-manager: Automates the issuance and renewal of certificates in Kubernetes.
- Istio: Configured to use the custom CA for issuing mTLS certificates within the service mesh.
Prerequisites
Before you begin, ensure you have the following:
- Tetrate Istio Subscription (TIS): Deployed in your Kubernetes cluster.
- Kubernetes Cluster: With cluster admin access (v1.28+ recommended).
- kubectl: Configured to interact with your cluster.
- Helm: Installed on your local machine.
- Cert-manager: Version 1.0.0 or later.
- OpenSSL: For certificate inspection (optional).
Steps
Step 1: Install vault
Vault is a secrets management tool that provides a secure PKI for issuing certificates.
-
Add the HashiCorp Helm Repository:
helm repo add hashicorp https://helm.releases.hashicorp.com --force-update -
Install Vault:
# Install Vault in dev mode (demo purposes only)
helm install vault hashicorp/vault \
    --namespace vault-demo \
    --create-namespace \
--set="server.dev.enabled=true" -
Verify Installation:
kubectl -n vault-demo get podsEnsure all Vault pods are in the
Runningstate.
Step 2: Configure Vault as a Root CA
Configure Vault to act as a Root Certificate Authority (CA) for issuing certificates.
-
Enable and Configure the PKI Backend:
- Access the Vault pod's shell.
- Enable the PKI secrets engine and configure its maximum Time-to-Live (TTL) for issued certificates.
kubectl exec -it vault-0 -n vault-demo -- /bin/shOnce inside the pod, run:
vault secrets enable pki
vault secrets tune -max-lease-ttl=87600h pki -
Create the Root CA and Configure URLs:
- Generate a self-signed root certificate and its corresponding private key.
- Configure the issuing and CRL URLs for the PKI backend.
vault write pki/root/generate/internal \
    common_name="my-org-rootca" \
    issuer_name="my-org-rootca-demo" \
    ttl=8760h

vault write pki/config/urls \
    issuing_certificates="http://vault.vault-demo:8200/v1/pki/ca" \
crl_distribution_points="http://vault.vault-demo:8200/v1/pki/crl" -
Configure Role and AppRole for cert-manager:
- Create a role that defines what certificates can be issued by
cert-manager. - Create a Vault policy that allows
cert-managerto sign intermediate CA certificates. - Enable the AppRole authentication method and create a specific role for
cert-managerto obtain a token.
vault write pki/roles/cert-manager \
    allowed_domains="svc" \
    require_cn=false \
    allow_subdomains=true \
    max_ttl=720h

vault policy write cert-manager - <<EOF
path "pki/root/sign-intermediate" {
    capabilities = ["create", "update"]
}
EOF

vault auth enable approle

vault write auth/approle/role/cert-manager \
    token_policies="cert-manager" \
    token_ttl=1h \
token_max_ttl=2h - Create a role that defines what certificates can be issued by
-
Collect AppRole Credentials:
Get the Role ID and Secret ID for the cert-manager AppRole. These credentials will be used by
cert-managerto authenticate with Vault.# Get Role ID
vault read auth/approle/role/cert-manager/role-idExpected output:
Key        Value
---        -----
role_id    <your-role-id>
# Get Secret ID
vault write -force auth/approle/role/cert-manager/secret-idExpected output:
Key                   Value
---                   -----
secret_id             <your-secret-id>
secret_id_accessor    <your-secret-id-accessor>
secret_id_ttl         0s
Step 3: Configure cert-manager for Vault Integration
This step details how to install cert-manager, configure a Kubernetes secret with the Vault AppRole credentials,
and create a cert-manager Issuer to establish a connection with the Vault PKI backend.
-
Install
cert-manager:Install cert-manager using its manifest file and then wait for the pods to be ready.
kubectl apply -f https://github.com/cert-manager/cert-manager/releases/download/v1.18.2/cert-manager.yaml
kubectl wait --for=condition=ready --timeout=300s -n cert-manager pod -l app.kubernetes.io/instance=cert-manager -
Configure
cert-managerVault integration:Create the
istio-systemnamespace:kubectl create ns istio-systemCreate Vault Secret
Replace the base64-encoded secretId with your actual value:
echo "your-secret-id" | base64Create
cert-managervault secret:cat << EOF | kubectl apply -n istio-system -f -
apiVersion: v1
kind: Secret
metadata:
name: cert-manager-vault-approle
namespace: istio-system
type: Opaque
data:
secretId: <base64-encoded-secretId> # replace with value from your previous step
EOFCreate
cert-managerIssuer- Use the roleId and the secret created in the previous step to define a Vault Issuer.
- This Issuer, named vault-issuer, will be used to request intermediate certificates from Vault's PKI backend.
# Apply the issuer manifest, replacing <your-role-id>
cat << EOF | kubectl apply -n istio-system -f -
apiVersion: cert-manager.io/v1
kind: Issuer
metadata:
  name: vault-issuer
  namespace: istio-system
spec:
  vault:
    path: pki/root/sign-intermediate
    server: http://vault.vault-demo:8200
    auth:
      appRole:
        path: approle
        roleId: <your-role-id> # replace with value from your previous step
        secretRef:
          name: cert-manager-vault-approle
          key: secretId
EOF
Verify the Issuer
- You can run these commands to verify the issuer:
kubectl get issuer -n istio-system
kubectl get issuer -n istio-system -o yaml
kubectl get issuer vault-issuer -n istio-system \
    -o=jsonpath='{.metadata.name}{"\t"}{.status.conditions[0].status}{"\t"}{.status.conditions[0].message}{"\t"}{.metadata.creationTimestamp}{"\n"}'
Expected output:
NAME           READY   STATUS           AGE
vault-issuer   True    Vault verified   7m28s
Step 4: Create Istio CA Certificate (cacerts)
This command creates a cert-manager Certificate resource in the istio-system namespace to request a
self-signed Istio CA certificate from the vault-issuer, storing the result in a secret named cacerts:
cat << EOF | kubectl apply -n istio-system -f -
apiVersion: cert-manager.io/v1
kind: Certificate
metadata:
  name: istio-ca
  namespace: istio-system
spec:
  secretName: cacerts
  duration: 720h    # 30 days
  renewBefore: 360h  # 15 days
  commonName: istiod-ca
  isCA: true
  issuerRef:
    name: vault-issuer
    kind: Issuer
EOF
Step 5: Install Istio (Optional)
Install Istio by referring to the TIS document.
Step 6: Verify Istio is Using Vault-Backed Certs
This final step confirms that Istio is successfully using the intermediate CA certificate issued by Vault
and managed by cert-manager.
Istio Certificate Reload
- Check the Istio logs to see if the certificate has been loaded. A successful log entry will indicate a certificate reload.
kubectl logs -n istio-system deployment/istiod | grep -i cert
More Verification Commands
- Use these commands to further inspect the certificates and their sources within the Kubernetes cluster.
# Verify cert-manager certificate
kubectl get certificate istio-ca -n istio-system

# Check certificate details
kubectl get secret cacerts -n istio-system -o json | \
    jq -r '.data."tls.crt"' | base64 -d | openssl x509 -text -noout


# Check Istio root certificate
kubectl get cm istio-ca-root-cert -n istio-system -o yaml

# Verify workload certificates
istioctl proxy-config secret <pod-name> -n <namespace> | grep ROOTCA
Step 7: Deploy Sample Applications
Deploy sample workloads to test the mTLS communication with the custom CA.
-
Deploy the Bookinfo Application:
kubectl label namespace default istio-injection=enabled
kubectl apply -f samples/bookinfo/platform/kube/bookinfo.yaml -
Verify Application Pods:
kubectl get podsEnsure all application pods are running with sidecar injection.
Best Practices
This section outlines best practices for managing the certificate lifecycle, handling rotation, and troubleshooting common issues in the Istio-Vault-cert-manager setup.
-
Certificate Lifecycle Management
Following PKI best practices, this integration leverages Vault and cert-manager for a robust and secure certificate lifecycle.
- Secure Issuance: All certificates are issued securely through Vault's PKI backend, ensuring a centralized and trusted source of truth.
- Automated Renewal: cert-manager automates the renewal process, reducing the risk of certificate expiration and operational overhead.
- Minimal Intervention: The automated system requires minimal manual intervention, which streamlines management and improves reliability.
-
Zero-Downtime Rotation
Proactive certificate rotation is key to maintaining a secure and stable service mesh.
- Proactive Rotation: Workload certificates typically have a short validity period (e.g., 24 hours). Schedule rotation proactively to prevent any service interruptions.
- Seamless Updates: The integration ensures certificate updates are applied seamlessly, leading to zero-downtime rotation.
-
Multi-Cluster Considerations
For environments with multiple Kubernetes clusters, consistency is critical.
- Consistent CA: Use a consistent root CA across all clusters to enable seamless and secure cross-cluster communication within the service mesh.
Monitoring and Troubleshooting
Effective monitoring and troubleshooting are essential for maintaining the health of your certificate infrastructure.
-
Certificate Expiry Monitoring
Regularly check the expiry dates of your certificates to prevent outages.
kubectl get certificate -A -o custom-columns=\
    NAME:.metadata.name,\
    NAMESPACE:.metadata.namespace,\
    EXPIRY:.status.notAfter
To monitor certificate issuance events:
kubectl get events -n istio-system --field-selector reason=Issuing -
CertificateRequest Pending
If CertificateRequest resources are stuck in a pending state, check the cert-manager logs for clues.
# Get pending certificate requests
kubectl get certificaterequest -n istio-system

# Check cert-manager logs for errors
kubectl logs -n cert-manager deployment/cert-manager -
Vault Authentication Errors
Authentication failures between cert-manager and Vault are a common source of issues.
# Verify the secret containing the Vault AppRole credentials
kubectl get secret cert-manager-vault-approle -n istio-system -o yaml

# Describe the issuer to check its status and error messages
kubectl describe issuer vault-issuer -n istio-system -
Workload Certificate Issues
If a workload is not receiving its certificate, inspect the secrets in the proxy configuration and the Istio root certificate.
# Check the secret configuration for a specific pod
istioctl proxy-config secret <pod> -n <namespace> | grep default

# Inspect the Istio root certificate ConfigMap
kubectl get cm istio-ca-root-cert -n istio-system