 Tetrate Patch ServiceVersion: alpha
Investigating Findings
The All findings tab in the CVEs view of Tetrate Patch Service shows one row per finding: one CVE on one image, with everything you need to judge urgency. Every row has a fix available, because CVEs with no fixed version are not reported at all. This page shows how to browse, filter, and search the table, read a single finding in full, and recognize the two ways a finding leaves your list.
Browsing All Findings
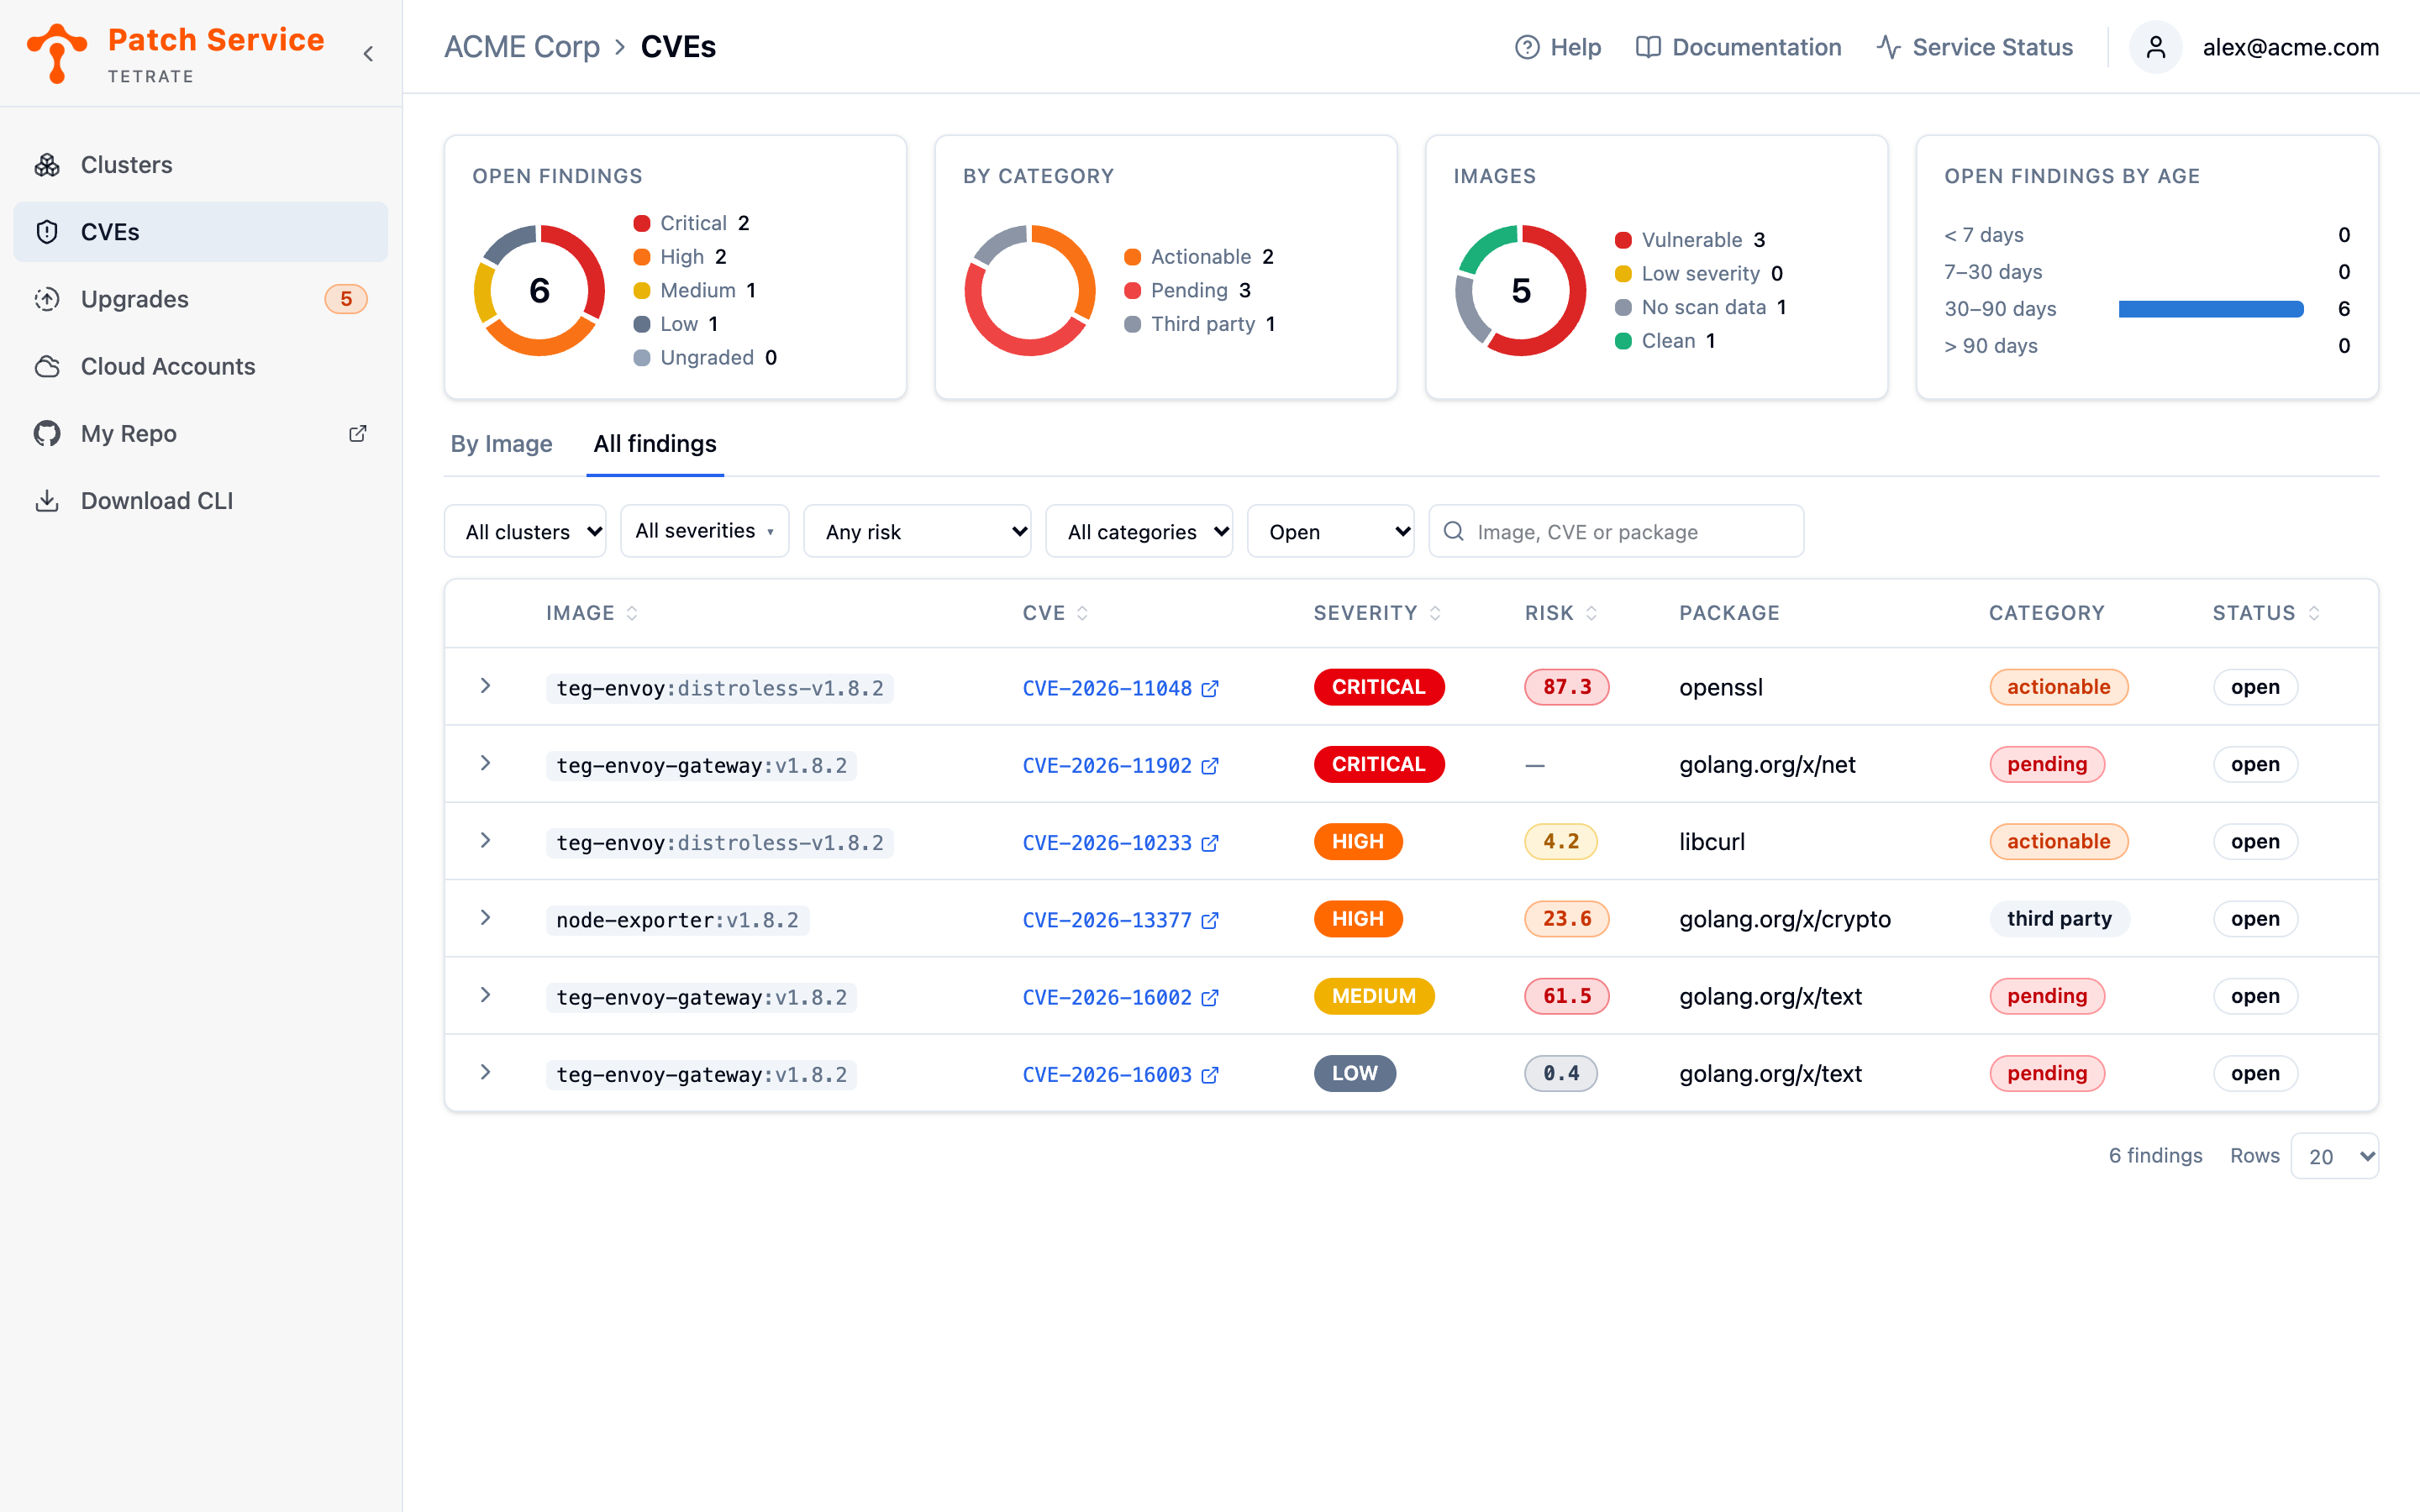
Open CVEs in the sidebar and switch to the All findings tab. Use the cluster selector (All clusters by default) to scope the table to a single cluster when you are investigating just one. Each row carries the finding's severity, risk, category, and status alongside the image, the CVE, and the affected package:
| Column | What it tells you |
|---|---|
| Image | The image the CVE was found in. |
| CVE | The CVE ID, linked to its entry in the National Vulnerability Database (NVD) for the full advisory. |
| Severity | How bad the vulnerability would be: Critical, High, Medium, or Low, or Ungraded when no advisory has graded it. |
| Risk | How likely the vulnerability is to be exploited, weighted by its impact, as a score from 0 to 100. The badge is tinted by its band: red for critical risk (50 and above), orange for high (10 and above), yellow for medium (1 and above), and gray for low. A dash means the finding is not scored yet, which is not the same as low risk. Hover over the badge for its band. |
| Package | The package inside the image that carries the vulnerability. |
| Category | Who acts: actionable (you, by upgrading), pending (Tetrate, in its next release), or third party (informational, not a Tetrate image). |
| Status | Open or resolved. Only a scan changes it. Resolved rows render dimmed and struck through, so open work stands out at a glance. |
The table opens in triage order: most severe first, and oldest first within a severity, so the top row is the worst thing that has been waiting longest. Sort by the Image, CVE, Severity, Risk, or Status column headers to reorder it. Sorting and the filters below apply to the complete result set, not just the page on screen, so the top of a severity sort is the worst finding in your fleet, not the worst on the current page.
Triaging by Risk
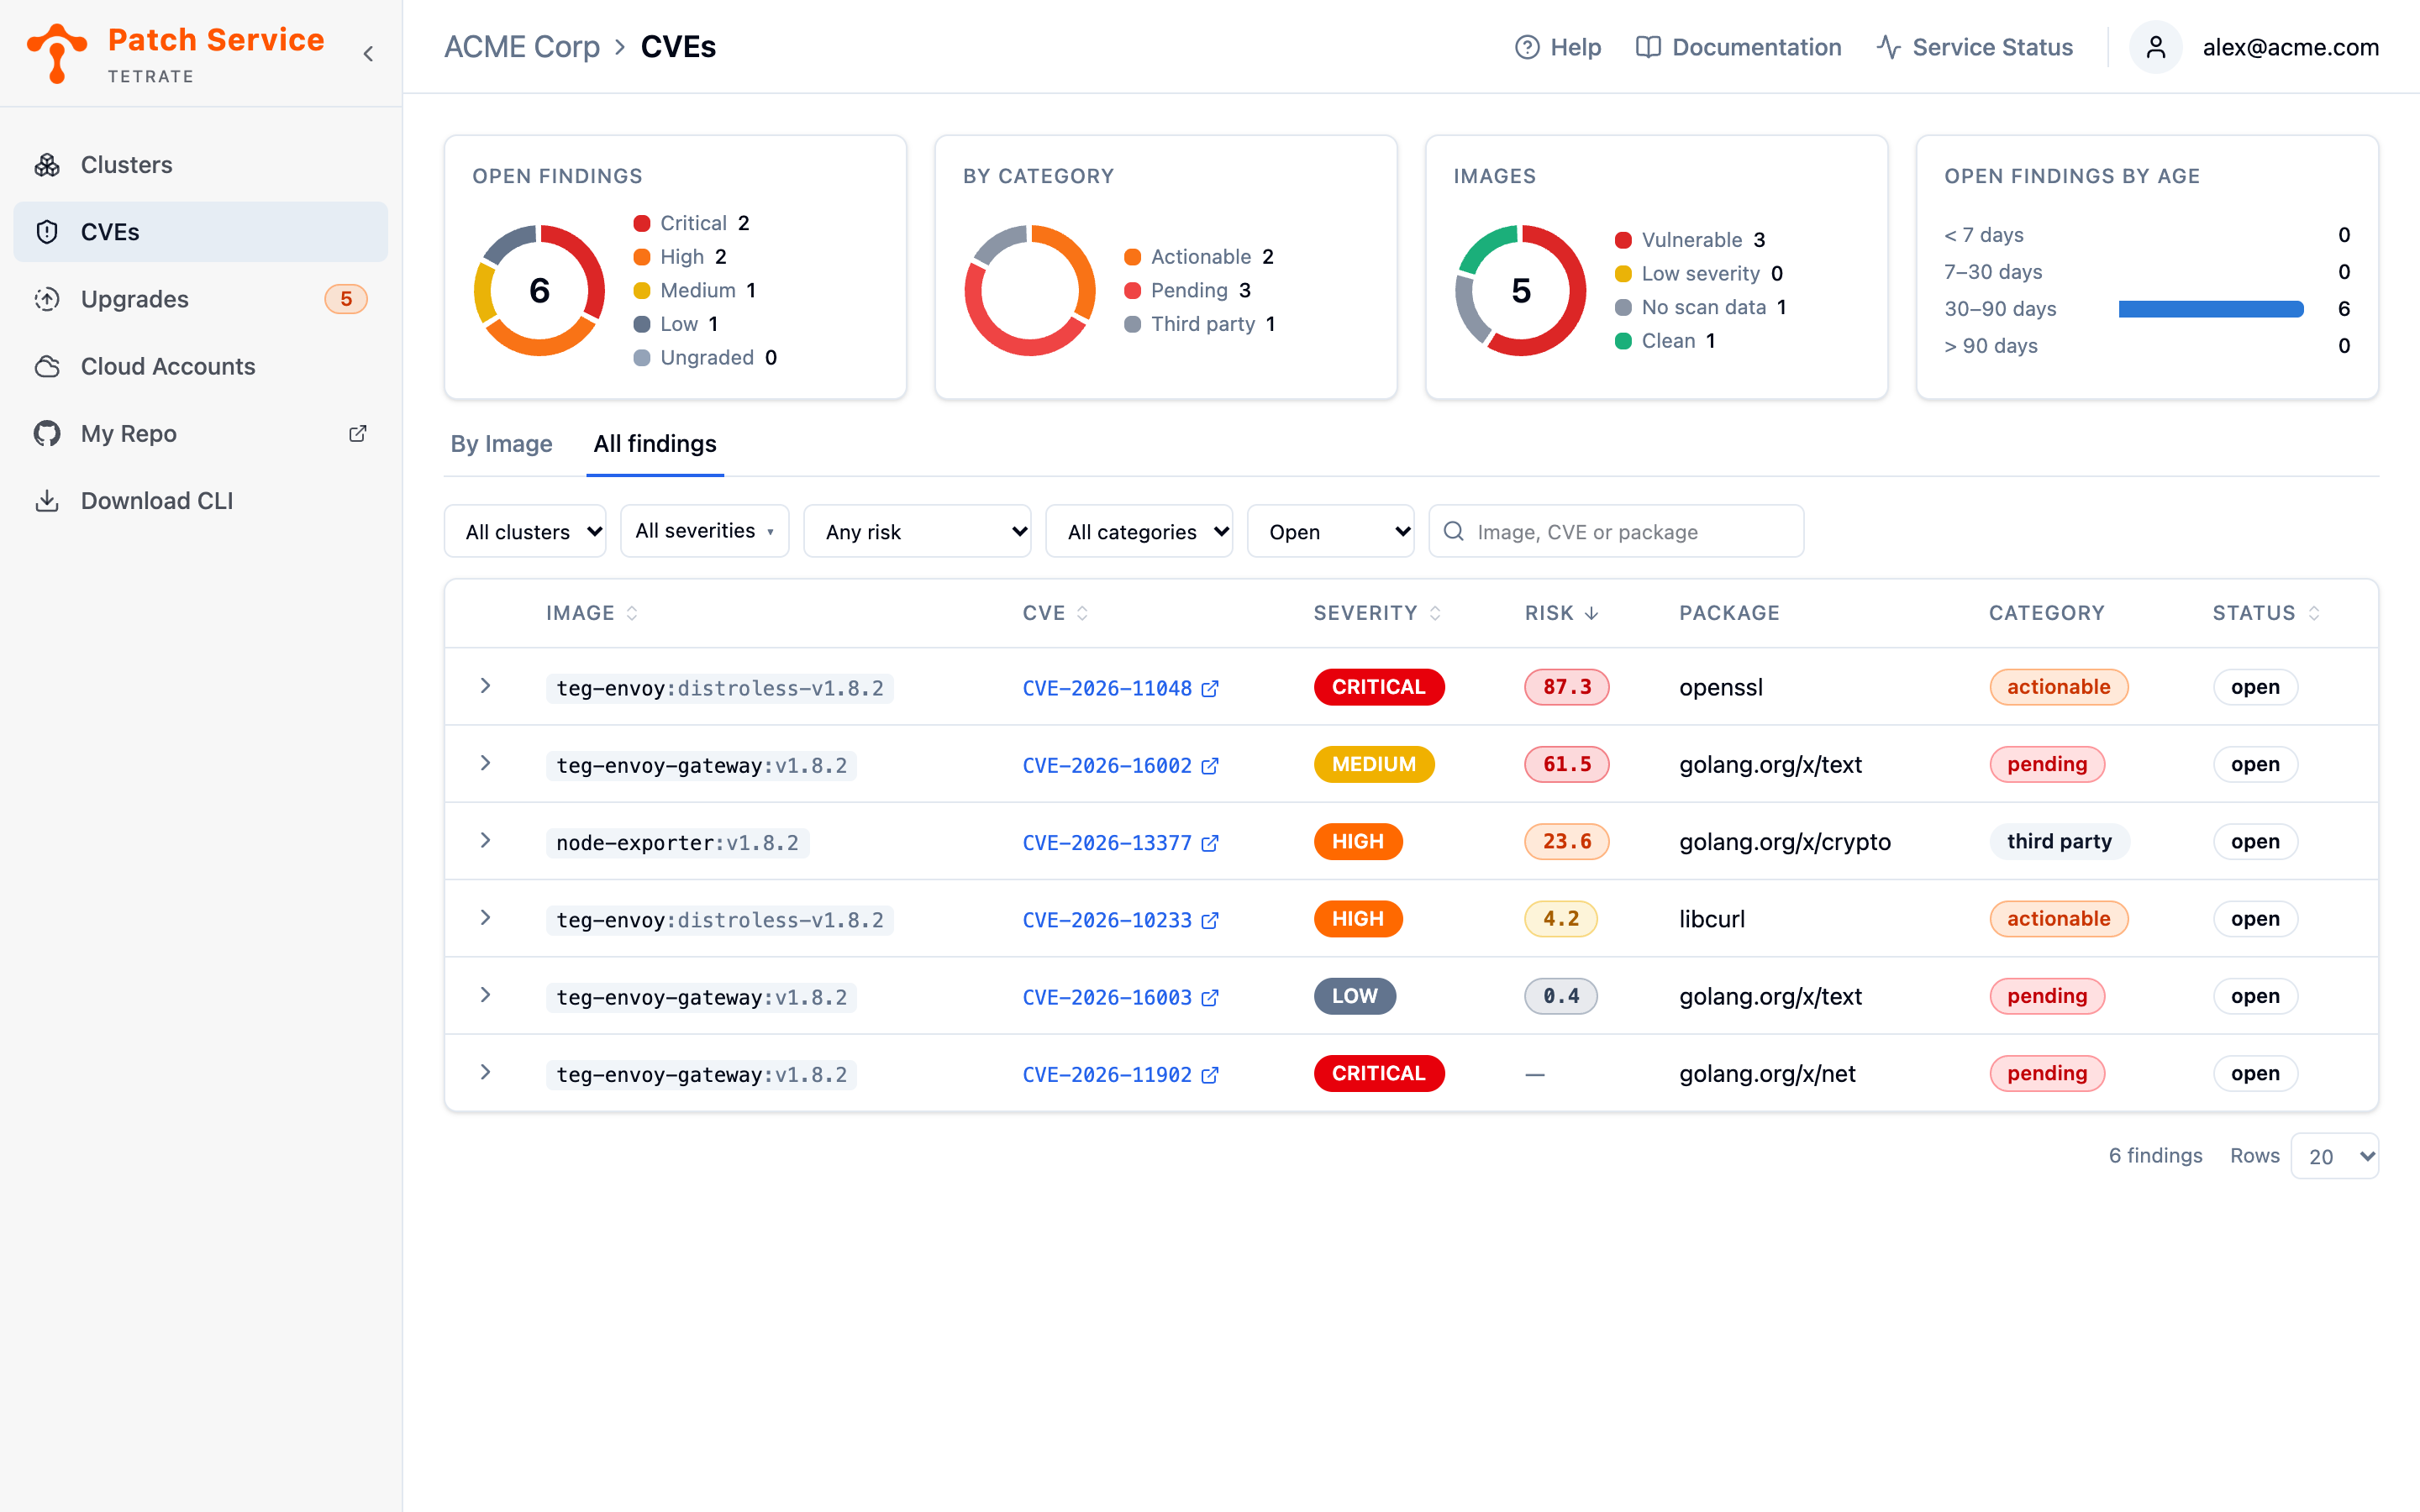
Severity alone ranks findings by how bad they would be, not by how likely they are to be attacked. Sort by Risk to see the second view: click the Risk column header and the table lists the highest scores first. Click it again to reverse the order.
Findings with no risk score always sort after every scored one, whichever direction you sort in, so the top of the list is always the most urgent finding that has been measured.
Compare the two orders to find the findings that severity alone would have ranked too low. In the example below, a Medium finding on teg-envoy-gateway scores 61.5, in the critical risk band, so it sorts ahead of two High findings and ahead of a Critical finding that has no score at all. Severity-first order would have put it fifth.
A high score is a reason to act sooner, not a reason to ignore a low one: an unscored or low-risk Critical finding is still serious, and new exploit data can raise its score at any scan. For what the score is built from and why most findings score low, see Severity and Risk.
Filtering Findings
The filter row above the table cuts the list down to exactly the slice you are working on.
- Filter by severity: pick one or more of Critical, High, Medium, Low, and Ungraded. Critical and High together are the natural first pass, and they are already what the default order puts on top.
- Filter by risk: Critical risk (≥ 50), High risk (≥ 10), or Medium risk (≥ 1) keeps only findings scored at least that high. Each choice matches the floor of the band its badge shows, so High risk (≥ 10) keeps both the high and critical risk bands. Setting a threshold also hides unscored findings, because a finding with no score has not been shown to meet it; switch back to Any risk to see them again.
- Filter by category: Actionable for findings you close by upgrading, Pending for findings whose fix arrives in Tetrate's next release (they re-categorize to actionable on their own when it ships), or Third party for informational findings on images Tetrate does not distribute.
- Filter by status. Open is the default, so resolved findings never clutter the working view. Switch to Resolved to confirm a fix landed, or All statuses to see both at once.
- Search for text in the box at the end of the row. It matches any part of the image, the CVE ID, or the package name, so
CVE-2025-1234answers whether a freshly published advisory affects you,opensslcollects every finding in that package, andenvoynarrows to one image. Severity, risk, category, and status are deliberately not searched: they have exact filters of their own, and searching them would make partial words match the wrong rows.
The filters and the search box combine, and all of them apply to your whole result set rather than the page on screen. When nothing matches, the table says so rather than showing an empty page, so a blank result means no such findings exist, not that they failed to load.
Reading a Finding's Details
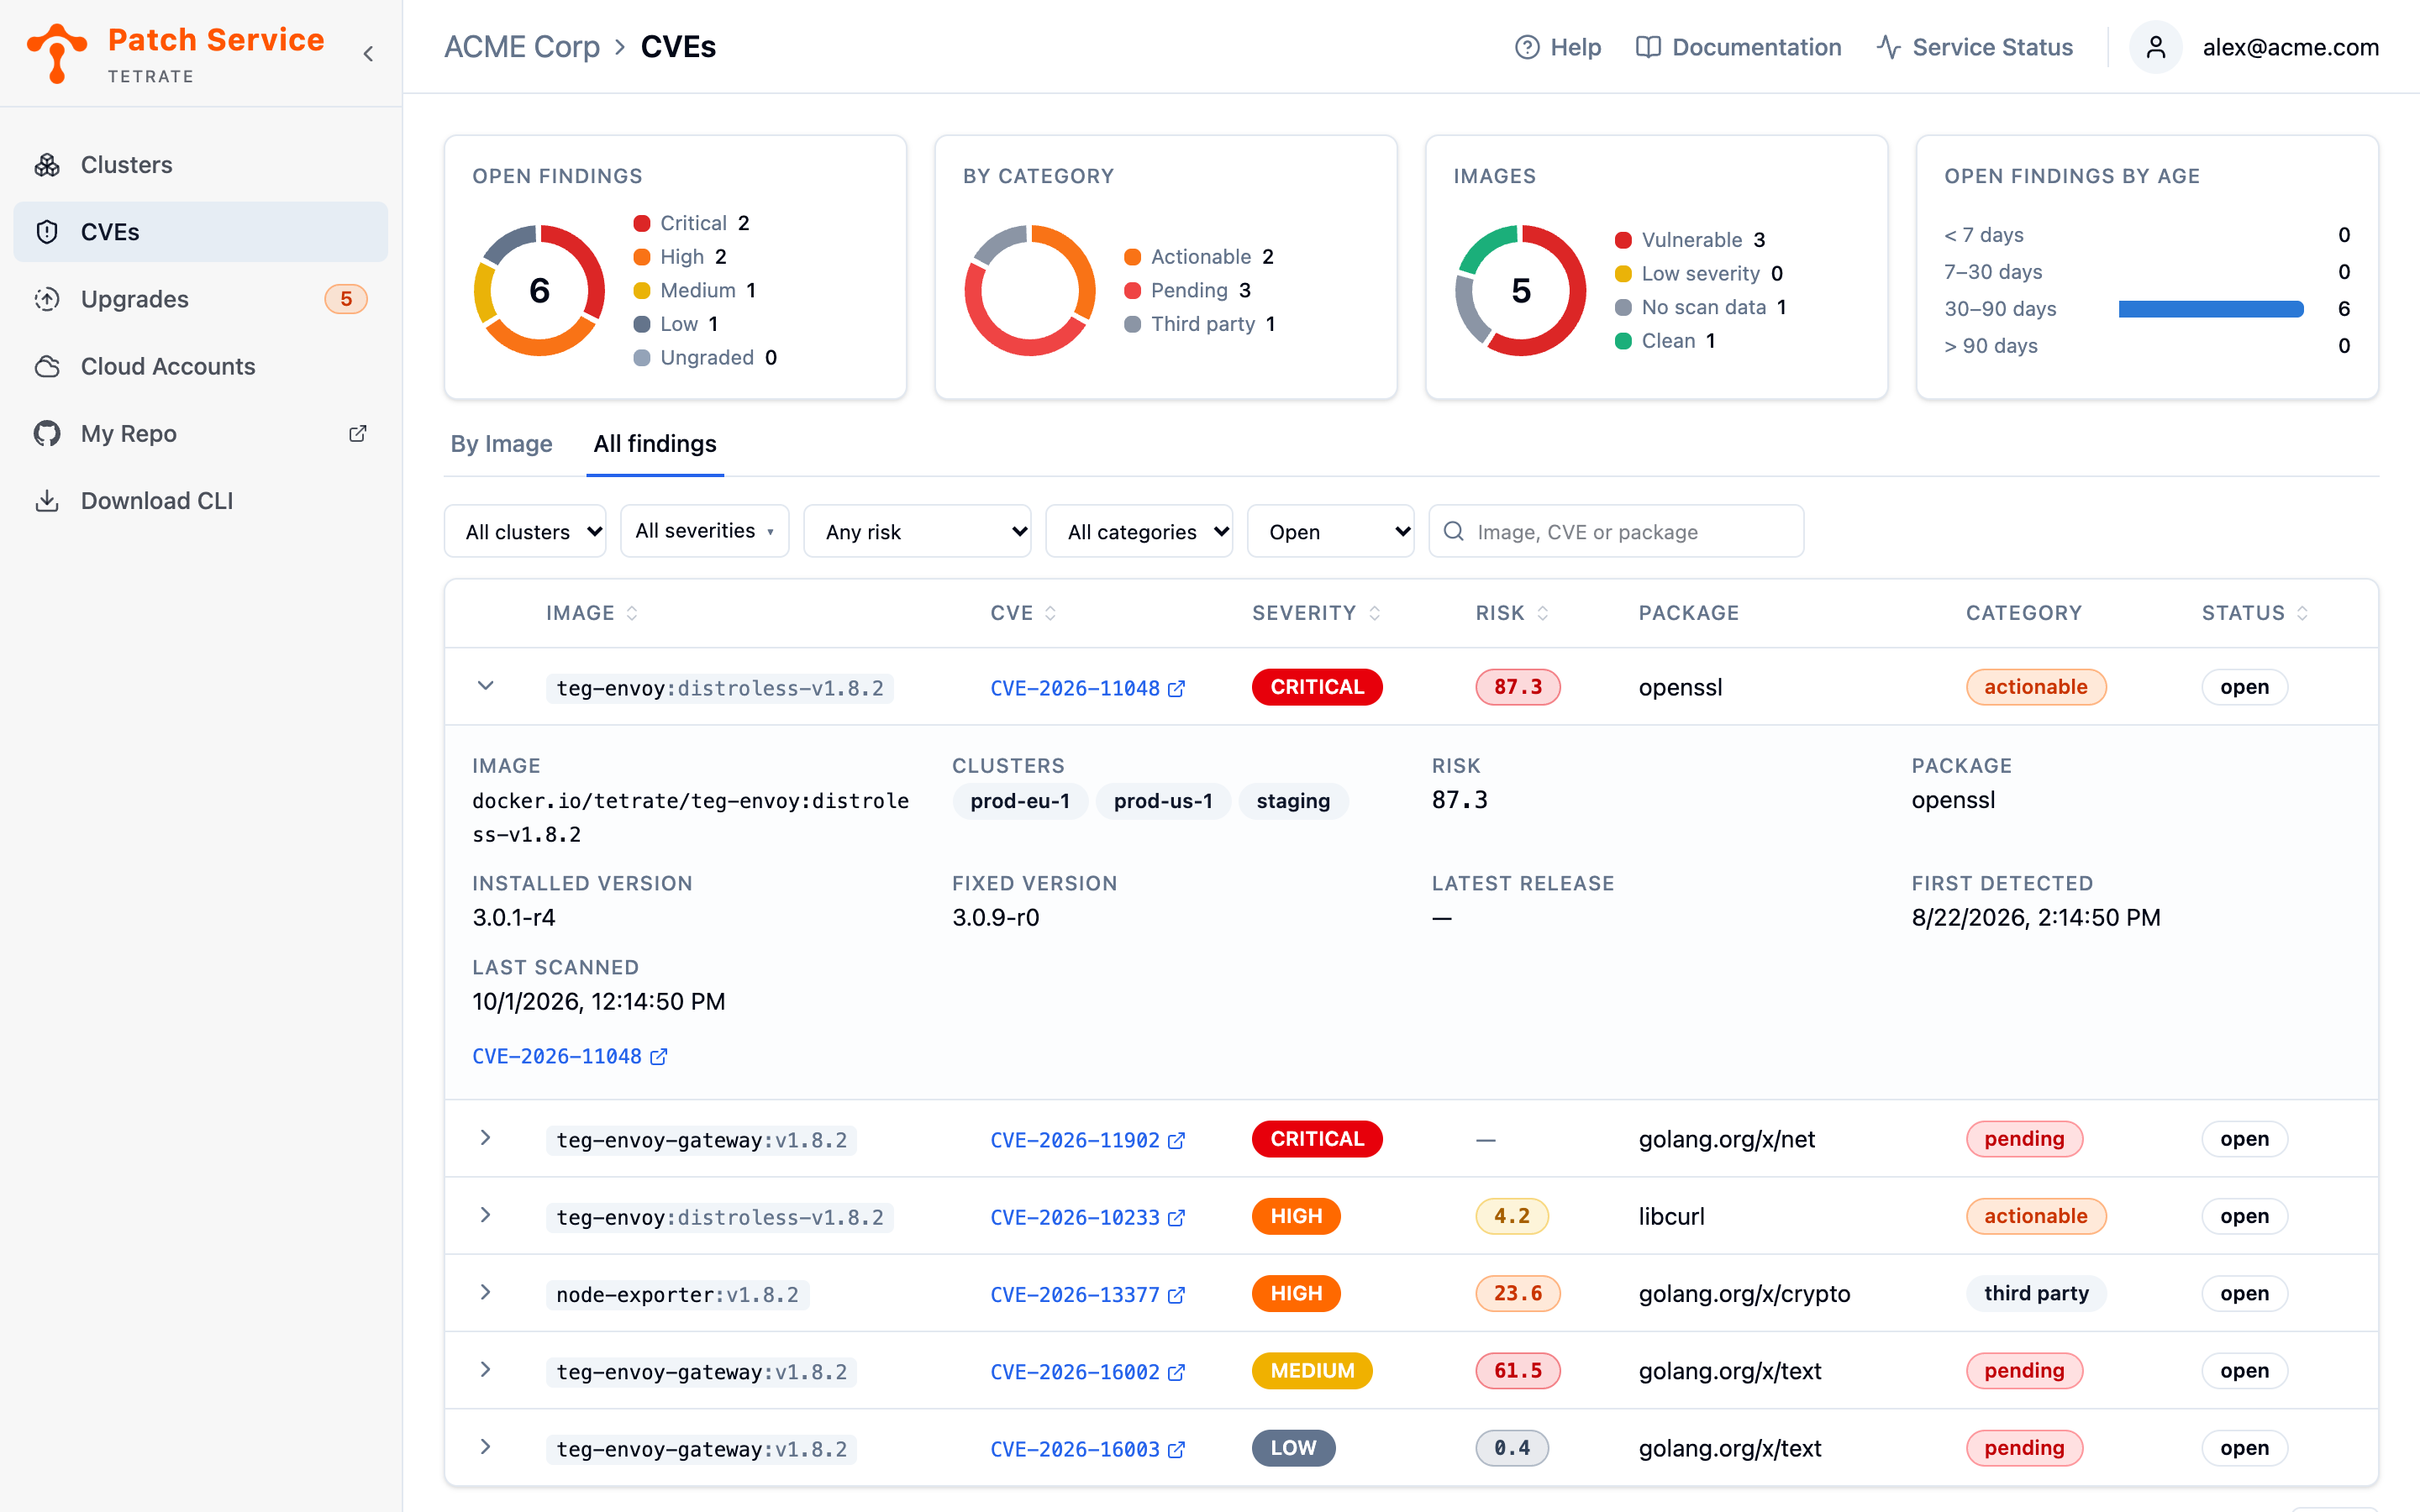
Click the arrow at the start of a row to expand the finding. The expansion is where a row becomes a decision: which clusters are exposed, what exactly is vulnerable, and how long it has been.
Clusters lists every cluster of yours running the affected image: one finding can expose several clusters, and this field is where you see which. Risk shows the score from the latest scan as a plain number, or not scored when no exploit-prediction data exists for the CVE yet. Package, Installed version, and Fixed version pin down the vulnerability itself: the affected package, the version the image ships, and the version that fixes it. On an actionable finding, Latest release names the upgrade target, the release whose image carries the fix.
Three timestamps date the finding. First detected is when the CVE was first reported on this image and never moves, so it is the finding's true age. Last scanned is when the evidence was last refreshed. Resolved findings add Resolved at.
How Findings Resolve
Only a scan moves a finding. The Patch Service deliberately offers no dismiss or accept-risk action: Tetrate owns remediation, so findings close on evidence that the fix is running, never on judgment that the risk is acceptable. A finding leaves your list in one of two ways:
| What you see | What happened |
|---|---|
| The status flips to resolved and the row renders dimmed and struck through. | The image was scanned again and the CVE is no longer present, the normal aftermath of an upgrade replacing the image. |
| The finding disappears from the list entirely. | No cluster of yours runs the affected image any longer. The table shows your current exposure, not your history. |
The agent must observe the new image running and a scan must confirm the CVE is gone; until then the finding stays open. That gap is the point: status reflects what your clusters run, not what you approved.
Next Steps
- Remediate the vulnerability when an actionable finding names an upgrade target you are ready to move to.
- Monitor vulnerabilities across your fleet when you want the summary picture, open counts, finding ages, and whether scans are current, instead of individual rows.
- Read CVE Scanning and Findings for the model behind severities, categories, and the scans that feed this table.