Tetrate Service BridgeVersion: 1.12.x
Istio Isolation Boundaries
Concept
Network Isolation and Environment Segmentation are crucial components of modern network architecture, ensuring scalability
and manageability of microservices-based applications. Tetrate Service Bridge introduces the concept of Isolation Boundary
to facilitate seamless control plane cluster upgrades, effective network isolation and environment segmentation.
Isolation Boundary is a concept within Tetrate Service Bridge that defines a logical boundary for microservices,
separating them into isolated environments. It acts as a virtual barrier, preventing unauthorized communication between
microservices residing in different isolation boundaries.
It is not only Segmentation and Network Isolation that is being addressed by Isolation Boundary, It can also be used for
seamless Istio control plane upgrades using multiple revisions configured under a single IsolationBoundary.
Isolation Boundary & Istio revisions
Isolation Boundary is conceptualized as a grouping of Istio revisions, with each revision serving as an instance of an Istio control plane. Within a given Isolation Boundary, you have the flexibility to generate numerous revisions. TSB facilitates the management of multiple Istio Isolation Boundaries within a single Kubernetes cluster.
Isolation Boundaries offer the capability to operate multiple Istio environments, all managed by TSB, either within a single Kubernetes cluster or across multiple clusters. This arrangement ensures isolation among these Istio environments in terms of service discovery and configuration distribution.
Use cases
Let's explore some practical scenarios where Isolation Boundaries prove instrumental
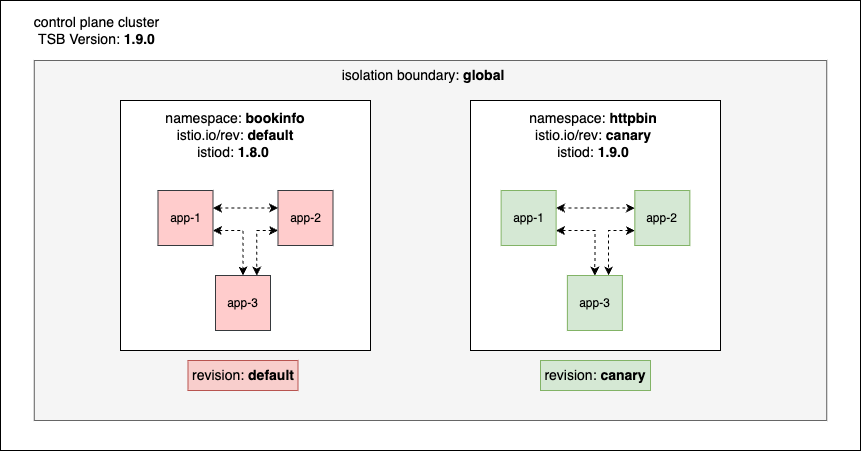
Revisioned Upgrades
Upgrading Istio Control plane has always been a challenging task for platform teams, as they need to cater to availability of the application workloads across different teams as the control plane clusters are mostly shared between teams.
IsolationBoundary as a concept addresses upgrade challenges by introducing global boundary and default revision as the
default settings under IsolationBoundary. Within global IsolationBoundary, multiple revisions can be added to introduce a
new TSB release for a limited set of test candidates to validate the upgrade, similar to how Istio facilitates control plane canary upgrades using revisions.
Once users gain confidence on the new TSB release, by testing the upgraded Istio proxies on the test candidates, users can
update the TSB release version to the latest under default revision.
spec:
  managementPlane:
  .
  .
  components:
    xcp:
      isolationBoundaries:
      - name: global
        revisions:
        - name: default
          istio:
            tsbVersion: 1.11.0 // Step 2 - Update old release version from `1.11.0` to `1.12.0` after validating `canary` release.
        - name: canary         // Step 1 - Introduce canary as a revision. By default TSB set this to the new release version during upgrade.
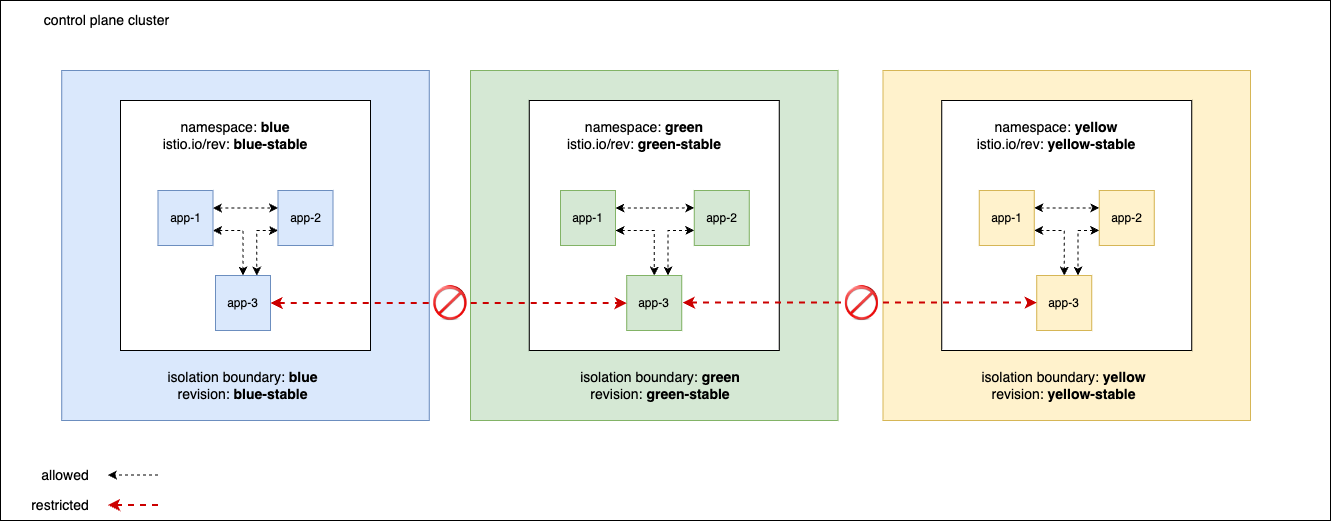
Network Isolation
In a modern cloud environment, most of the k8s clusters are shared among different Tenants/Teams scoped based on their business boundary.
Most people use namespace as the segmentation factor. Using Isolation Boundary you can create a virtual group of collections of namespaces and workloads which are isolated from each other in terms of visibility and discoverability within a single cluster.
Having multiple isolation boundaries set up in a single/multiple clusters allow users to run multiple mesh environments
that are segregated in terms of service discovery. This means that a service in one Isolation Boundary will only be discoverable
to clients in the same Isolation Boundary, and therefore will allow traffic to services in the same Isolation Boundary.
Services that are separated via isolation boundaries are not able to discover each other, leading to no inter-boundary traffic.
Consider the following example, where you have a collection of services which belong to each team i.e Blue, Green and Yellow. You can achieve network isolation
for the workloads belonging to each team using Isolation Boundary as configured below.
spec:
  managementPlane:
  .
  .
  components:
    xcp:
      isolationBoundaries:
      - name: blue
        revisions:
        - name: blue-stable
      - name: green
        revisions:
        - name: green-stable
      - name: yellow
        revisions:
        - name: yellow-stable
Here multiple namespaces and services under a common Tenant/Team can belong to a single Isolation Boundary. Once you apply the above configuration in a control plane cluster, TSB will create 3 dedicated istio controlplane for each revisions mentioned in the config.
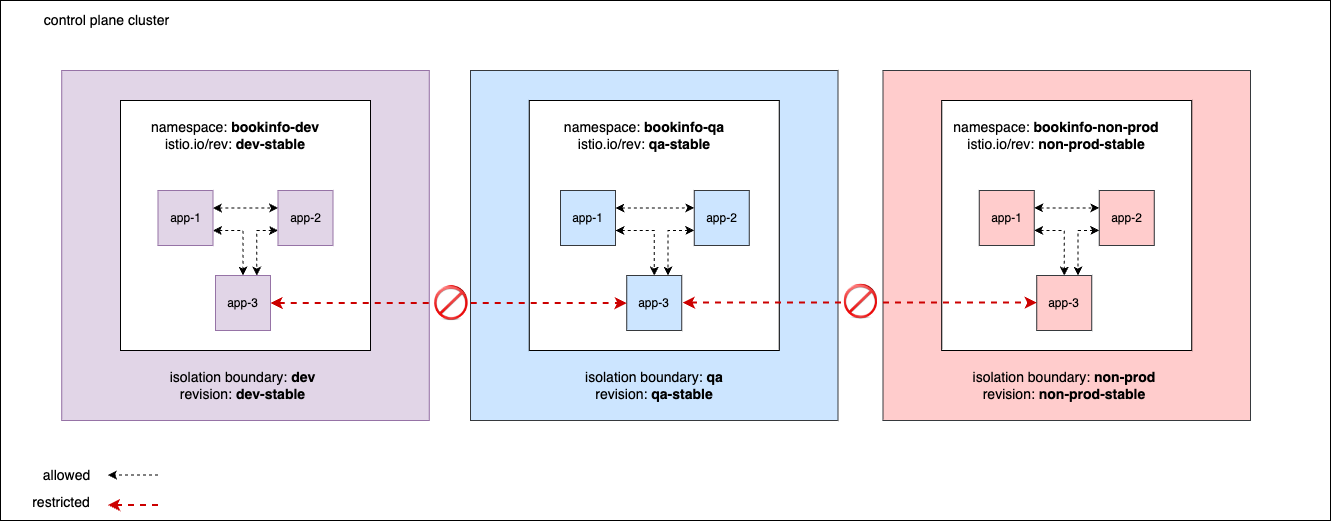
Environment Segmentation
Environment segmentation within a single cluster allows organisations to manage multiple environments like dev/qa/non-prod within in a single cluster scoped based on namespaces, provided workloads belong to
each environments are isolated from the other in terms of discoverability and network access.
Having multiple isolation boundaries set up in a single clusters allow users to run multiple mesh environments like dev/qa/non-prod, that are segregated in terms of service discovery.
This means that a service in one Isolation Boundary will only be discoverable to clients in the same Isolation Boundary, and therefore will allow traffic to services in the same Isolation Boundary.
Services that are separated via isolation boundaries are not be able to discover each other, leading to no inter-boundary traffic.
Consider the following example, where you have introduced multiple environments like dev, qa and non-prod in a single cluster. You can achieve network isolation
for the workloads belonging to each environment using Isolation Boundary as configured below. TSB can make sure no inter-boundary traffic is allowed between these environments leading to completely isolated environment group within a single cluster.
spec:
  managementPlane:
  .
  .
  components:
    xcp:
      isolationBoundaries:
      - name: dev
        revisions:
        - name: dev-stable
      - name: qa
        revisions:
        - name: qa-stable
      - name: non-prod
        revisions:
        - name: non-prod-stable