 Tetrate Service BridgeVersion: next
Installing an Active / Standby pair of Management Plane instances
How to install an Active / Standby pair of Management Plane instances, using the embedded Postgres database.
In this workflow, you will learn how to:
- Create DNS entries for each Management Plane instance, and a floating DNS name that points to the active Management Plane instance
- Create a PKI and issue certificates for the Management Plane instances from a common Certificate Authority
- Install your active Management Plane instance
- Create a service account on this active instance, which will be used to synchronize its configuration database
- Install the standby Management Plane instance
DNS for each Management Plane instance
Your first step will be to determine the DNS names that you will use for each Management Plane instance, and for a floating DNS name that will point to the active Management Plane instance:
In this documentation, we'll refer to these as:
- MP1_DNS, MP2_DNS, etc. are used for each Management Plane instance, for example: mp1.tsb.example.com, mp2.tsb.example.com, etc.
- MP_FLOAT_DNS is used to access the currently-active Management plane, for example: active.tsb.example.com. This name is a CNAME for the active Management Plane FQDN, and is updated when you fail over to a new Management Plane
You will configure these DNS entries as you proceed through the installation process.
Create a PKI and Issue Certificates
You'll need the following PKI hierarchy:
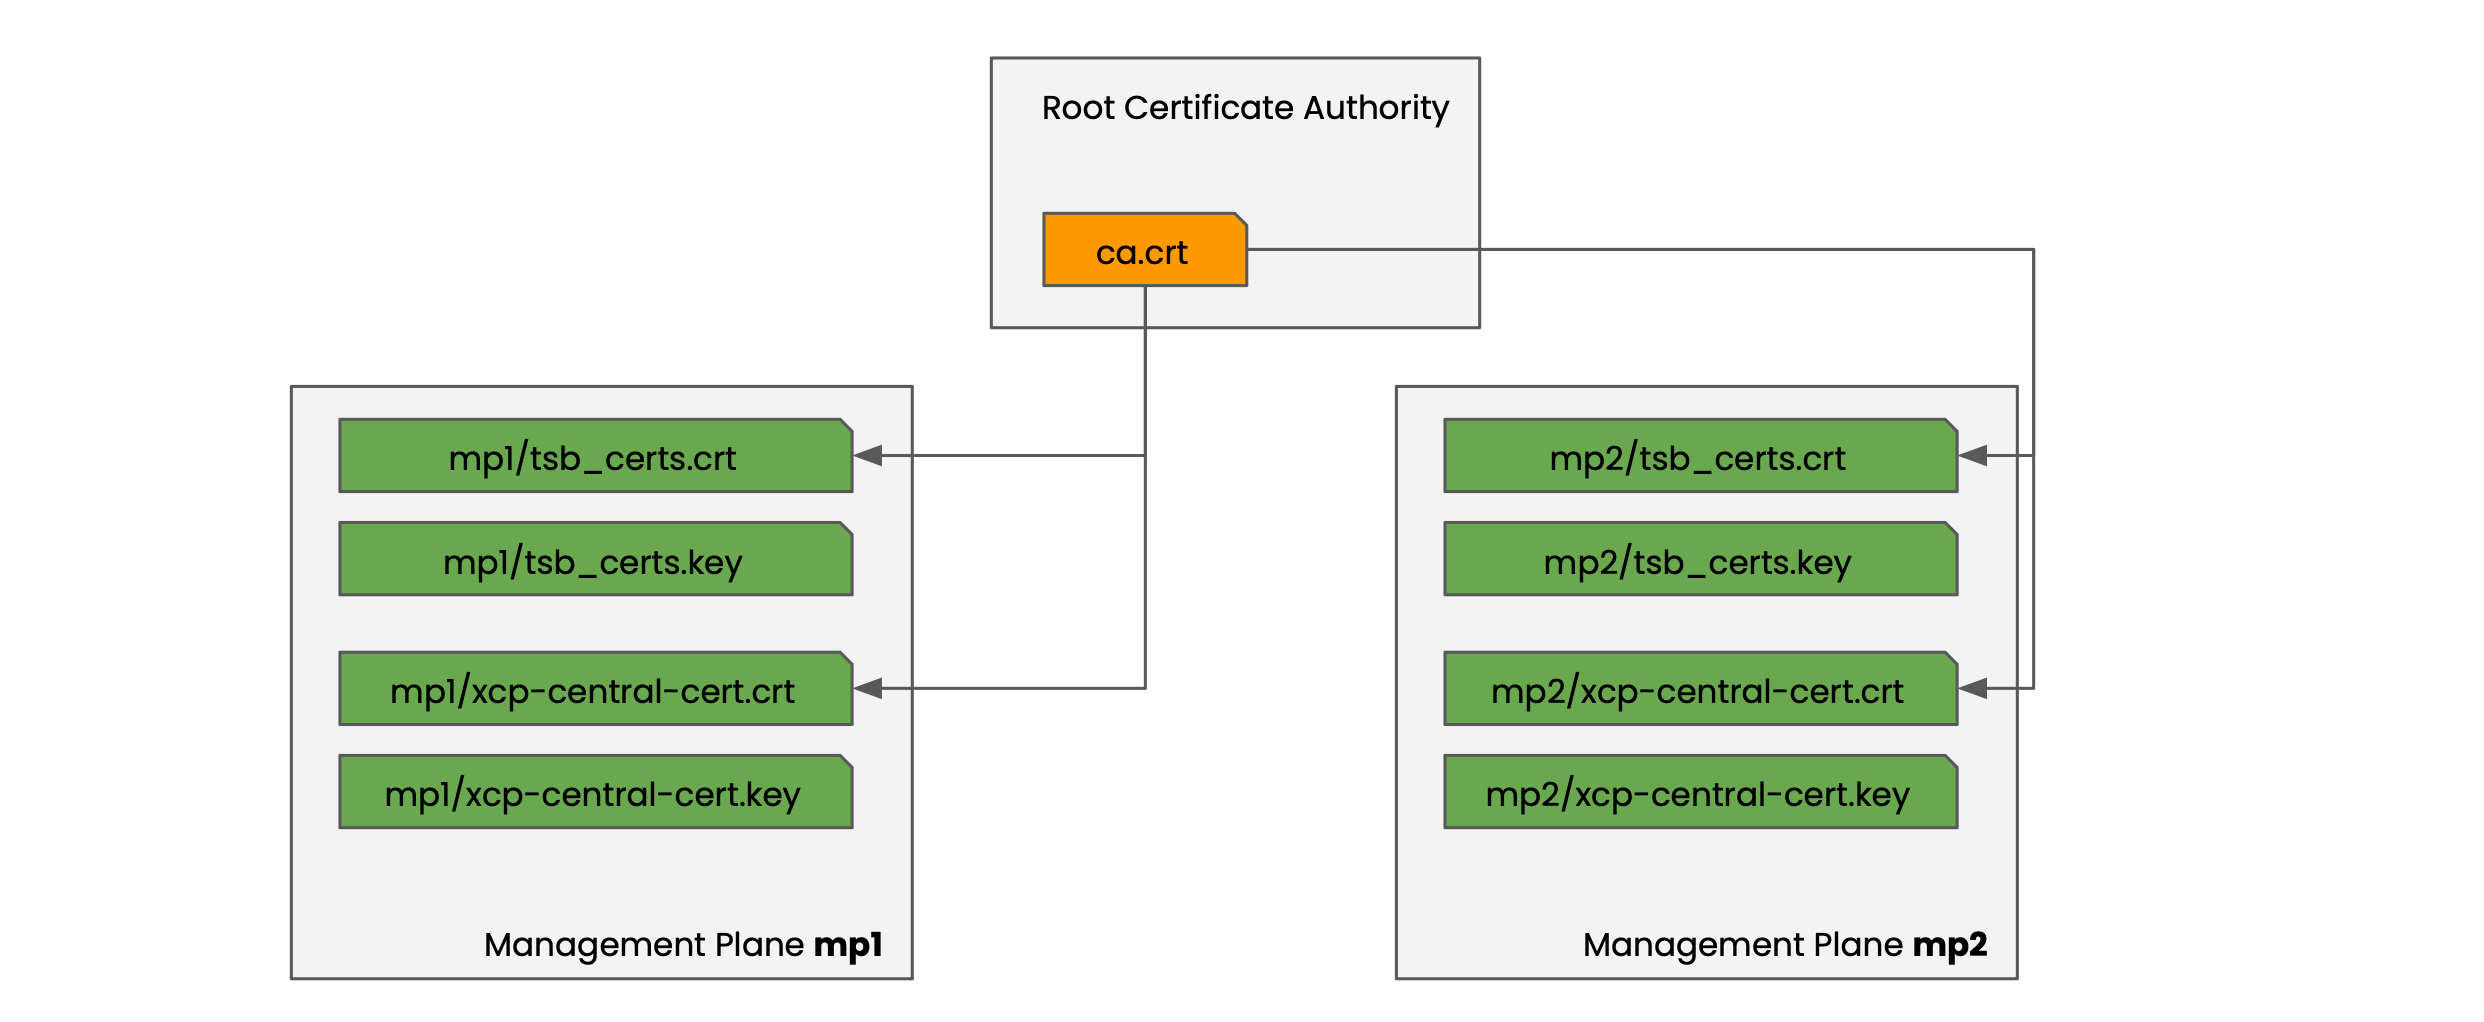 PKI hierarchy for CA and Management Planes PKI hierarchy for CA and Management Planes |
|---|
Note that:
- The certificates tsb_certs and xcp-central-cert are signed by the same root CA
- The SAN values in tsb_certs and xcp-central-cert should contain both the MP_DNS and MP_FLOAT_DNS names
For more information on the certificate hierarchy used by Tetrate Service Bridge, refer to Certificate Setup.
Deploy the Active Management Plane instance
You should first create an appropriate certificate hierarchy for the active Management Plane. You can create the certificates for the standby instance now, or at a later stage.
You then deploy the active Management Plane, configure the DNS names, and start to onboard clusters.
Finally, prepare for the addition of a standby Management Plane by configuring the active Management Plane to expose the embedded Postgres database to appropriately authenticated connections.
Install the active Management Plane instance
Prepare the helm values for the active Management Plane. The helm values file must contain the following settings:
TSB Secretssecrets:
elasticsearch:
username: tsb
password: tsb-elastic-password
ldap:
binddn: cn=admin,dc=tetrate,dc=io
bindpassword: admin
postgres:
username: tsb
password: tsb-postgres-password
tsb:
adminPassword: tsb-admin-password
cert: |
$(awk '{printf " %s\n", $0}' < mp/tsb_certs.crt)
key: |
$(awk '{printf " %s\n", $0}' < mp/tsb_certs.key)
xcp:
autoGenerateCerts: false
central:
cert: |
$(awk '{printf " %s\n", $0}' < mp/xcp-central-cert.crt)
key: |
$(awk '{printf " %s\n", $0}' < mp/xcp-central-cert.key)
rootca: |
$(awk '{printf " %s\n", $0}' < ca/ca.crt)Note that we use fixed passwords for postgres, elastic and the management plane, so that these can be used in our future standby install as well.
Expose Postgresspec:
highAvailability:
active:
exposeEmbeddedPostgresInFrontEnvoy: trueThe
active.exposeEmbeddedPostgresInFrontEnvoysetting will expose the embedded Postgres instance on port 5432, so that the Standby instance can connect and synchronize. Clients will need to use the service account created later to bootstrap their access and obtain the necessary credentials.Install the Management Plane using helm.
Configure the DNS name for Management Plane endpoint
Once your Management Plane is installed, you can determine the external IP address for the
envoyservice. Configure the following DNS entries for your active Management Plane:- The Permanent FQDN mp1.tsb.example.com must resolve to the external IP address of the
envoyservice in the Management Plane installation - The Floating FQDN active.tsb.example.com must be a CNAME for the permanent FQDN mp1.tsb.example.com
Verify that you can log in to the Management Plane instance using the floating FQDN.
- The Permanent FQDN mp1.tsb.example.com must resolve to the external IP address of the
Onboard Control Plane clusters
You can now begin onboarding Control Plane clusters to the active Management Plane.
When you do so, use the following values in your helm values:
Values for the Control Plane installationsecrets:
elasticsearch:
cacert: |
$(awk '{printf " %s\n", $0}' < ca/ca.crt)
tsb:
cacert: |
$(awk '{printf " %s\n", $0}' < ca/ca.crt)
xcp:
rootca: |
$(awk '{printf " %s\n", $0}' < ca/ca.crt)
spec:
managementPlane:
clusterName: $CLUSTER_NAME
host: $MP_FLOAT_DNS # Important - this must be the floating FQDN, e.g. 'active.tsb.example.com'
port: 443
selfSigned: trueYou can also start onboarding services and creating the TSB hierarchy and configuration.
Create a service account with read permissions
Use tctl or any other approach to create a service account on the active Management Plane. Retain the private key tsb-standby-sa-b64e:
tctl sa create tsb-standby-sa | base64 -w0 > tsb-standby-sa-b64e
Grant the service account org-reader permissions:
tctl get ab organizations/MYORG -o yaml \
   | yq '.spec.allow += [{"role":"rbac/org-reader","subjects":[{"serviceAccount":"organizations/MYORG/serviceaccounts/tsb-standby-sa"}]}]' \
   | tctl apply -f -
Apply the secret to the active Management Plane. It will be needed if this Management Plane instance is configured to be a standby instance in the future:
TSB_STANDBY_SA_JWK=`cat tsb-standby-sa-b64e`
kubectl -n tsb apply -f - <<EOF
apiVersion: v1
kind: Secret
metadata:
  name: tsb-standby-sa
data:
  jwk: $TSB_STANDBY_SA_JWK
type: Opaque
EOF
Your active Management Plane is ready to use, and you can proceed at any point to install and configure a standby Management Plane instance.
Install a standby Management Plane instance
Next, install a standby Management Plane instance to synchronise its configuration from the active instance. This standby instance will run in a limited mode, with no UI or API to manage configuration.
The standby instance will use a different permanent FQDN, such as mp2.tsb.example.com.
Import the Secrets
Before installing the standby Management Plane, acquire the necessary secrets from the active Management Plane:
Export the secrets from the active management planekubectl get secrets -n tsb -o yaml iam-signing-key tsb-standby-sa > source_mp_operational_secrets.yamlPre-configure the standby Management Plane with these secrets:
Import to the standby Management Planekubectl create ns tsb
kubectl apply -f source_mp_operational_secrets.yamlNote that the
tsb-iam-jwkstoken is required, but will be generated on the standby Management Plane from theiam-signing-key.Install cert-manager
The standby install process deploys a limited TSB installation. You should install cert-manager manually before installing the standby:
Make sure to configure your kubectl context to point to the standby cluster!Install cert-managmer on the standby TSB clusterhelm repo add jetstack https://charts.jetstack.io
helm repo update
helm install cert-manager jetstack/cert-manager -n cert-manager --create-namespace \
--set installCRDs=true \
--set featureGates="ExperimentalCertificateSigningRequestControllers=true"Deploy the Standby instance
Deploy a standby Management Plane instance into the
tsbnamespace on the standby cluster.Start with the same basic helm values as used for the active Management Plane instance, and make two important changes:
Certificates: Make sure to use the appropriate tsb-certs and xcp-central-cert for this installation.
Standby Mode: Do not use the
spec.highAvailabilitysettings that were added in the active installation. Instead, use the following lines in thespecstanza:helm configuration for standbyspec:
...
highAvailability:
standby:
activeMpSynchronizationEndpoint:
host: $MP1_DNS # the permanent DNS name or IP address of the active management plane instance
port: 443 # the port exposed by the front-envoy in the active management plane instance, typically 443
selfSigned: true # Needed if the cert if selfsigned or signed by a private CAPerform the Installation: Install the standby Management Plane instance using helm, to the new standby cluster.
When installing in Standby mode, only a limited set of services will run. You will not be able to use the API or UI for this management plane. The Postgres database will attempt to synchronize from the nominated Active instance.
Follow the logs from the management plane operator to observe the reconfiguration and catch any errors:
kubectl logs -n tsb -l name=tsb-operator -f
You have now installed a standby Management Plane instance that is inactive, but is synchronising state with the active Management Plane instance.
Note that the DNS entry MP2_DNS is not known at this point, because the standby installation does not install and expose a front-envoy service. You will configure this entry when you promote the standby to active.
Additional notes
How does the standby Management Plane connect and synchronize?
These docs present the auto-configuration method, where the standby Management Plane is supplied with the service account details so that it can connect to an auto-configuration API endpoint. The standby then receives the necessary additional credentials and configuration so that the standby Postgres database can securely connect to port 5432 and begin to replicate.
Alternatively, you can configure the standby with the necessary certificates and credentials manually, and then configure the standby database to connect and replicate using embeddedPostgresReplicationSettings.