Tetrate Service BridgeVersion: 1.5.x
Vault PKI Integration
This document describes how to setup TSB and Vault so that Vault can be used as an External CA.
Before proceeding, make sure to follow the instructions in the Common Setup for External CA Integration, install cert-manager, and generate the root CA certificate and key.
Setup Vault
Install Vault. It does not need to be installed in the same Kubernetes cluster, but it should be reachable from inside the Kubernetes cluster.
The following instructions installs Vault server in "dev" mode for demo purposes, but this is not recommended for production setup.
For more details, please check the Vault documentation
kubectl create namespace vault-demo

kubectl config set-context --current --namespace=vault-demo

helm install vault hashicorp/vault --set='server.dev.enabled=true'
Enable Vault PKI
You will need to enable Vault's PKI Secrets Engine. This feature allows Vault to generate dynamic X.509 certificates.
First, enable the PKI Secrets Engine:
vault secrets enable pki
The optionally setup the PKI Secrets Engine to issue certificates with a maximum time-to-live (TTL) of 87600 hours (10 years):
vault secrets tune -max-lease-ttl=87600h pki
Setup Root CA in Vault
Execute the following command to setup the root CA in Vault with the certificate and key that you have created in a previous step:
vault write -format=json pki/config/ca pem_bundle="$(cat ca.crt ca.key)"
Optionally you may choose to let Vault generate a root CA for you, which allows you to skip generating the root CA yourself. Please read the official documentation for more details
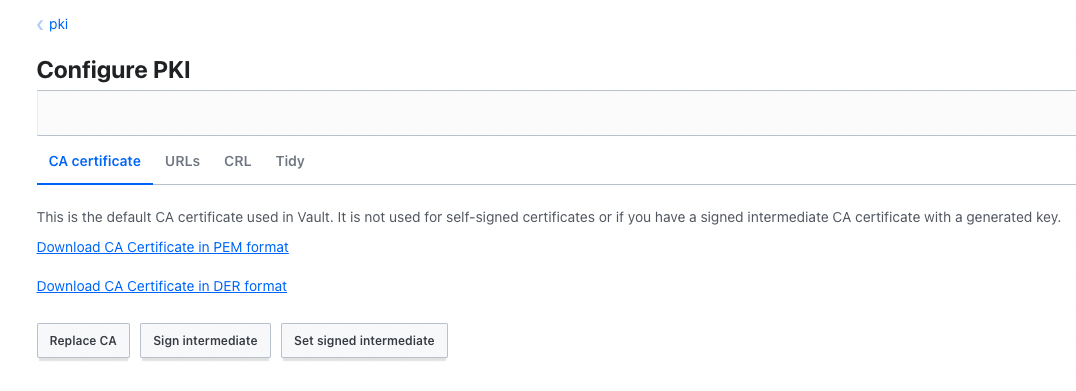
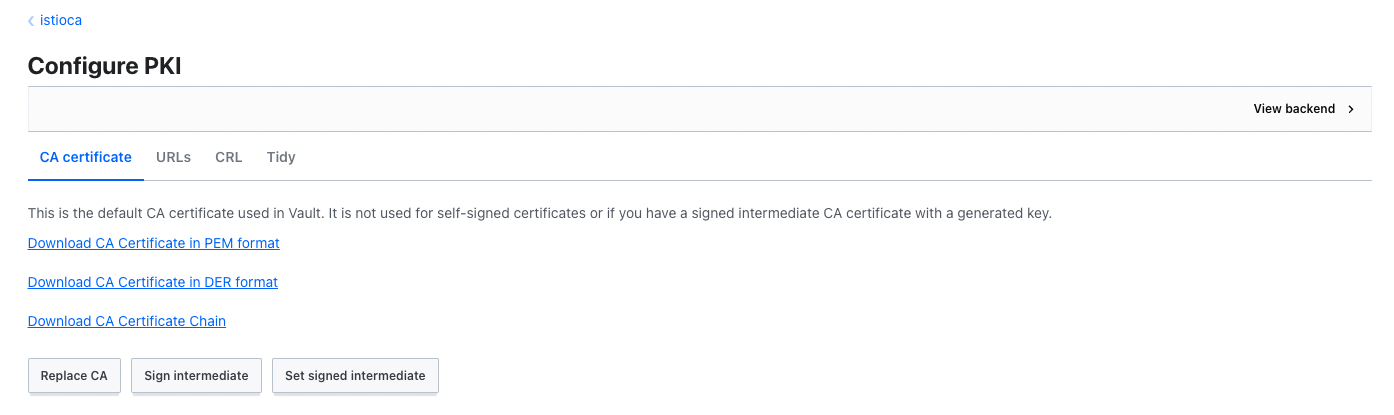
Once you have the certificate and key stored in vault, you may verify them by downloading and inspecting them from the Vault UI.
Setup Intermediate CA for Istio
Now that you have a CA in Vault, You can use it to create an intermediate CA for Istio.
You can re-use the pki secret backend, but you will need to set it up using with a new path (istioca).
First execute the following to enable PKI in a new path for intermediate CA:
vault secrets enable --path istioca pki
Then update the lease time for the intermediate CA to 5 years:
vault secrets tune -max-lease-ttl=43800h istioca
Finally, create the intermediate CA cert and key:
vault write istioca/intermediate/generate/exported common_name="test-subordinate.tetrate.info" ttl=43800h
Key                 Value
---                 -----
csr                 -----BEGIN CERTIFICATE REQUEST-----
MIICcTCCAVkCAQAwLDEqMCgGA1UEAxMhdGV0cmF0ZS5pbyBJbnRlcm1lZGlhdGUg
...
-----END CERTIFICATE REQUEST-----
private_key         -----BEGIN RSA PRIVATE KEY-----
MIIEpQIBAAKCAQEAsVV/nFwGRiPCwQWF9AeyBqMljE5D5176jXokgkzE/RMJ1e5t
...
-----END RSA PRIVATE KEY-----
...
Copy value for the csr into a local file named istioca.csr, and value for the private_key into a file named istioca.key. Make sure to include -----BEGIN CERTIFICATE REQUEST----- and -----END CERTIFICATE REQUEST-----.
Copy the CA Key into a local file istioca.key. It is advised to keep a backup of this key in a secure place.
Then sign the intermediate certificate with the root CA private key:
vault write pki/root/sign-intermediate csr=@istioca.csr format=pem_bundle ttl=43800h
Key              Value
---              -----
certificate      -----BEGIN CERTIFICATE-----
MIIDTTCCAjWgAwIBAgIUOrRcTeL1mWN10YXhcxAzo8u10VAwDQYJKoZIhvcNAQEL
...
-----END CERTIFICATE-----
...
Save the value of certificate to a file named istioca.crt.
Once the CSR is signed and the root CA returns a certificate, it can be imported back into Vault. Execute the following command to set the certificate for the intermediate CA:
vault write istioca/intermediate/set-signed certificate=@istioca.crt
You can view the intermediate CA using Vault UI.
Setup Authentication From The Control Plane
Access to the information in Vault will be done via AppRole authentication.
Create a role named cluster-local, which only allows access from the local cluster. In this case, it is expected that the cert-manager will need to access Vault in order to periodically update the intermediate CA.
vault write istioca/roles/cluster-local allowed_domains="svc" allow_subdomains=true max_ttl="720h" require_cn=false allowed_uri_sans="spiffe://cluster.local/*"
Enable AppRole authentication in Vault:
vault auth enable approle
Then create a Vault policy to allow cert-manager in the local cluster to update the intermediate CA
vault policy write cert-manager -<<EOF path "istioca/sign/cluster-local" { capabilities = ["update"] } EOF
Create a role named cert-manager. The following command also configures Vault to apply the cert-manager policy that you have created above when agents authenticate with Vault using the cert-manager role.
vault write auth/approle/role/cert-manager token_policies="cert-manager" token_ttl=1h token_max_ttl=4h
Finally, save the values for role-id, and secret-id so that you can use them later.
vault read auth/approle/role/cert-manager/role-id
Key        Value
---        -----
role_id    091aa68b-....0a523f9
vault write -force auth/approle/role/cert-manager/secret-id
Key                   Value
---                   -----
secret_id             a18a7f36-....-c1a8760b0873
...
Integrate cert-manager and Vault
Vault must be configured to be cert-manager's Issuer to act as a CA.
Since the Istio is the component that will have to directly communicate with Vault, the following resources will be created under the istio-system namespace.
You must create a secret in istio-system namespace containing the value of secret-id that you have obtained in the previous step. Create a file named vault-secret.yaml using the template below. Note that the value of secret-id must be base64-encoded.
apiVersion: v1
kind: Secret
type: Opaque
metadata:
  name: cert-manager-vault-approle
  namespace: istio-system
data:
  secretId: <SECRET-ID-BASE64>
Apply it using kubectl:
kubectl apply -f vault-secret.yaml
Once the secret has been created, create the Issuer, specifying it to authenticate using the role-id and secret-id via the AppRole method. Create a file named vault-issuer.yaml using the following template:
apiVersion: cert-manager.io/v1
kind: Issuer
metadata:
  name: vault-issuer
  namespace: istio-system
spec:
  vault:
    path: istioca/sign/cluster-local
    server: https://<VAULT_ADDRESS>
    auth:
      appRole:
        path: approle
        roleId: <ROLE-ID>
        secretRef:
          name: cert-manager-vault-approle
          key: secretId
Then apply it using kubectl:
kubectl apply -f vault-issuer.yaml
You can check that the issuer is verified by executing the following command:
kubectl get issuers vault-issuer -n istio-system -o wide
NAME           READY   STATUS           AGE
vault-issuer   True    Vault verified   1m
Install istio-csr
Download the intermediate CA certificate in PEM format from Vault, and save it as istio-ca.pem.
Then create a secret containing this certificate in the cert-manager namespace:
kubectl create secret generic istio-root-ca \
  --namespace cert-manager \
  --from-file=ca.cert.pem=istio-ca.pem
Then install istio-csr using helm. This agent also creates a secret, istiod-tls , which holds the TLS certificate and key for istiod to serve.
helm upgrade cert-manager-istio-csr jetstack/cert-manager-istio-csr \
  --install \
  --namespace cert-manager \
  --set "app.server.clusterID=<CLUSTER_NAME>"
  --set "app.certmanager.issuer.name=vault-issuer" \
  --set "app.tls.rootCAFile=/var/run/secrets/istio-csr/ca.cert.pem" \
  --set "volumeMounts[0].name=root-ca" \
  --set "volumeMounts[0].mountPath=/var/run/secrets/istio-csr" \
  --set "volumes[0].name=root-ca" \
  --set "volumes[0].secret.secretName=istio-root-ca"
Verify that istio-csr is running, and that the istiod certificate is in a ready state.
kubectl get pods -n cert-manager
NAME                                       READY   STATUS    RESTARTS   AGE
cert-manager-6d6bb4f487-rvltm              1/1     Running   0          10d
cert-manager-cainjector-7d55bf8f78-4xf7m   1/1     Running   0          10d
cert-manager-istio-csr-85459d48dc-8lvxl    1/1     Running   0          17s
cert-manager-webhook-5c888754d5-9czqq      1/1     Running   0          10d
kubectl get certificates -n istio-system
NAME     READY   SECRET       AGE
istiod   True    istiod-tls   97s
Configure TSB ControlPlane CRD
Finally, you will need to update ControlPlane Custom Resource and add the istiod component configuration by specifying the newly created certificate via overlays.
Create a file named control-plane.yaml, with the following content.
apiVersion: install.tetrate.io/v1alpha1
kind: ControlPlane
metadata:
  name: controlplane
  namespace: istio-system
spec:
  components:
    istio:
      kubeSpec:
        overlays:
        - apiVersion: install.istio.io/v1alpha1
          kind: IstioOperator
          name: tsb-istiocontrolplane
          patches:
          - path: spec.values.global.caAddress
            value: cert-manager-istio-csr.cert-manager.svc:443
          - path: spec.components.pilot.k8s.env
            value:
            - name: POD_NAME
              valueFrom:
                fieldRef:
                  apiVersion: v1
                  fieldPath: metadata.name
            - name: POD_NAMESPACE
              valueFrom:
                fieldRef:
                  apiVersion: v1
                  fieldPath: metadata.namespace
            - name: ENABLE_CA_SERVER
              value: "false"
          - path: spec.components.pilot.k8s.overlays
            value:
            - apiVersion: apps/v1
              kind: Deployment
              name: istiod
              patches:
              - path: spec.template.spec.containers.[name:discovery].args[7]
                value: --tlsCertFile=/etc/cert-manager/tls/tls.crt
              - path: spec.template.spec.containers.[name:discovery].args[8]
                value: --tlsKeyFile=/etc/cert-manager/tls/tls.key
              - path: spec.template.spec.containers.[name:discovery].args[9]
                value: --caCertFile=/etc/cert-manager/ca/root-cert.pem
              - path: spec.template.spec.containers.[name:discovery].volumeMounts[6]
                value:
                  mountPath: /etc/cert-manager/tls
                  name: cert-manager
                  readOnly: true
              - path: spec.template.spec.containers.[name:discovery].volumeMounts[7]
                value:
                  mountPath: /etc/cert-manager/ca
                  name: ca-root-cert
                  readOnly: true
              - path: spec.template.spec.volumes[6]
                value:
                  name: cert-manager
                  secret:
                    secretName: istiod-tls
              - path: spec.template.spec.volumes[7]
                value:
                  configMap:
                    defaultMode: 420
                    name: istio-ca-root-cert
                  name: ca-root-cert
And apply it using kubectl:
kubectl apply -f control-plane.yaml
Verify the Root CA of a new application
To verify, deploy can deploy a new application and look at the content of secrets used by istio for that workload.
Execute the following commands to deploy a sleep workload in namespace foo:
kubectl create ns foo
kubectl label ns foo istio-injection=enabled
kubectl apply -f https://raw.githubusercontent.com/istio/istio/master/samples/sleep/sleep.yaml -n foo
Then get the list of pods to find out the pod's name:
kubectl get pods -n foo
NAME                     READY   STATUS    RESTARTS   AGE
sleep-557747455f-rcsmr   2/2     Running   0          12s
Finally, use istioctl to show the list of secrets that istio is using for the named pod.
istioctl pc secret sleep-557747455f-rcsmr -n foo -o json
{
  "dynamicActiveSecrets": [
    {
      "name": "default",
      "versionInfo": "0",
      "lastUpdated": "2022-04-13T12:28:17.402Z",
      "secret": {
        "@type": "type.googleapis.com/envoy.extensions.transport_sockets.tls.v3.Secret",
        "name": "default",
        "tlsCertificate": {
          "certificateChain": {
            "inlineBytes": "<BASE64_ENCODED_CERTIFICATE_CHAIN>"
          },
          ...
          {
            "name": "ROOTCA",
            "versionInfo": "0",
            "lastUpdated": "2022-04-13T12:28:18.132Z",
            "secret": {
              "@type": "type.googleapis.com/envoy.extensions.transport_sockets.tls.v3.Secret",
              "name": "ROOTCA",
              "validationContext": {
                "trustedCa": {
                  "inlineBytes": "<BASE64_ENCODED_ROOT_CA>"
                }
              }
            }
          }
        }
      }
    }
  ]
}
Take note of the content of the first certificate from certificateChain and decode the value that is in base64 encoding, and
save in a file named foo.crt
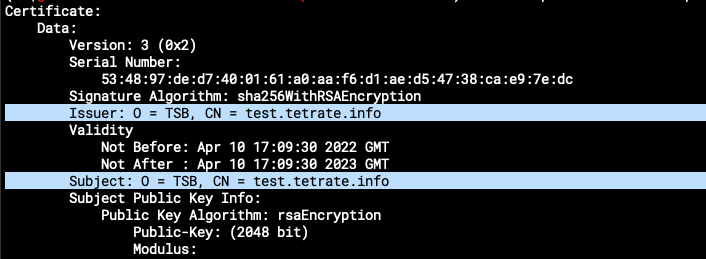
You can inspect the certificate using openssl, and verify that the issuer, CA issuer, SAN, and other fields have the expected values.
openssl x509 -in foo.crt -text -noout
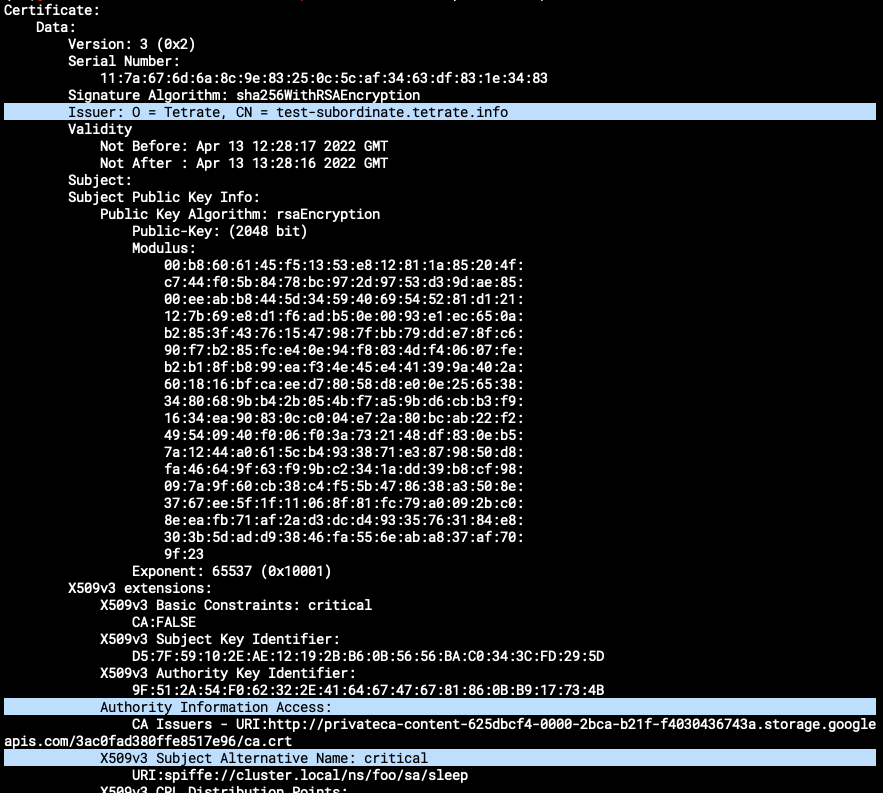
The ROOTCA from sleep secret should match the value of ca.crt that you have created at the beginning. You can decode the value of trustedCa that is in base64 encoding, and
save it in a file named root.crt
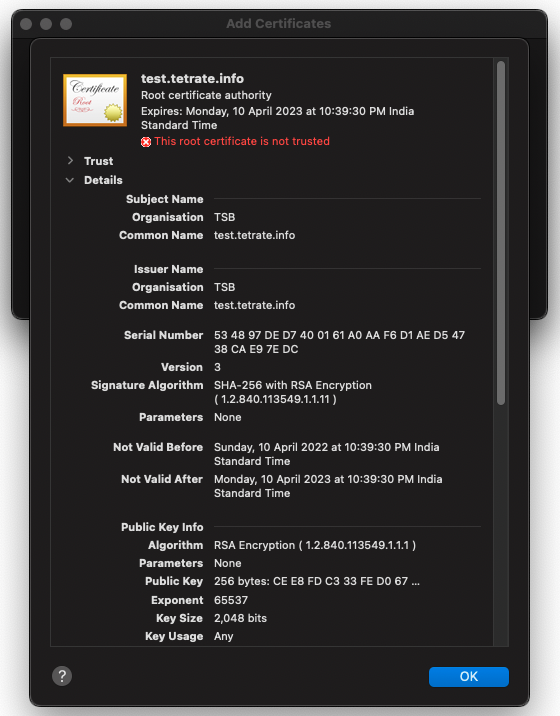
Inspect the certificate using openssl, It will be same as the Root CA which you configured in the first step.
openssl x509 -in root.crt -text -noout